
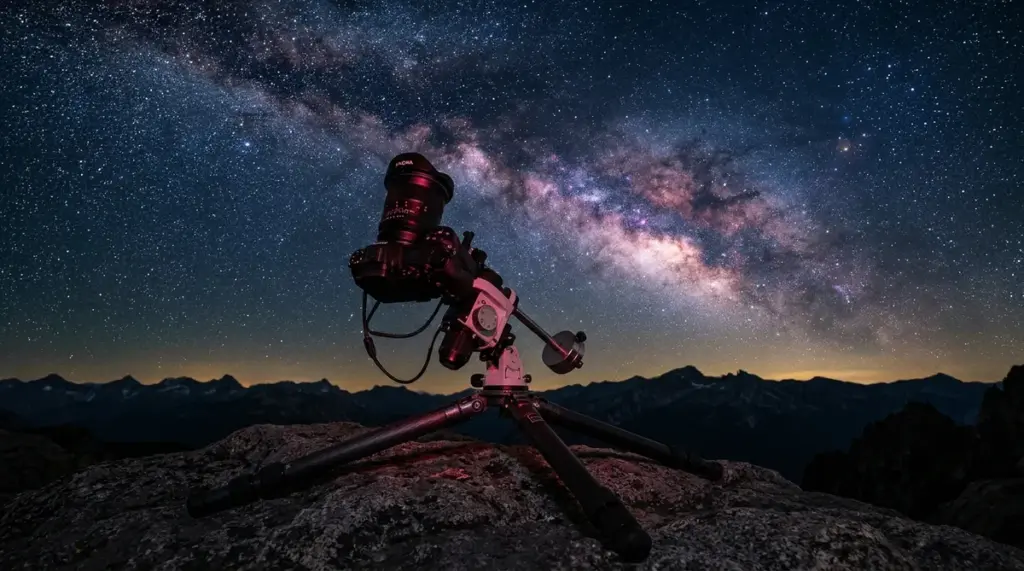
The complete guide to choosing cameras, understanding lenses, mastering star trackers, and building an astrophotography setup for the night sky.
Astrophotography lets us photograph celestial objects that are too faint, too distant, or too detailed to appreciate fully with the unaided eye. From the sweeping Milky Way and familiar constellations to distant galaxies, glowing nebulae, and the cratered surface of the Moon, modern digital cameras make astronomical photography accessible to beginners and experienced observers alike.
However, producing sharp, detailed photographs of the night sky requires more than pointing a camera upward. Earth’s rotation makes stars appear to move across the sky, faint celestial objects demand careful exposure control, and every lens has optical characteristics that affect star sharpness. Understanding astrophotography equipment, particularly the camera, lens, and tracking system, is essential before investing in specialized gear.
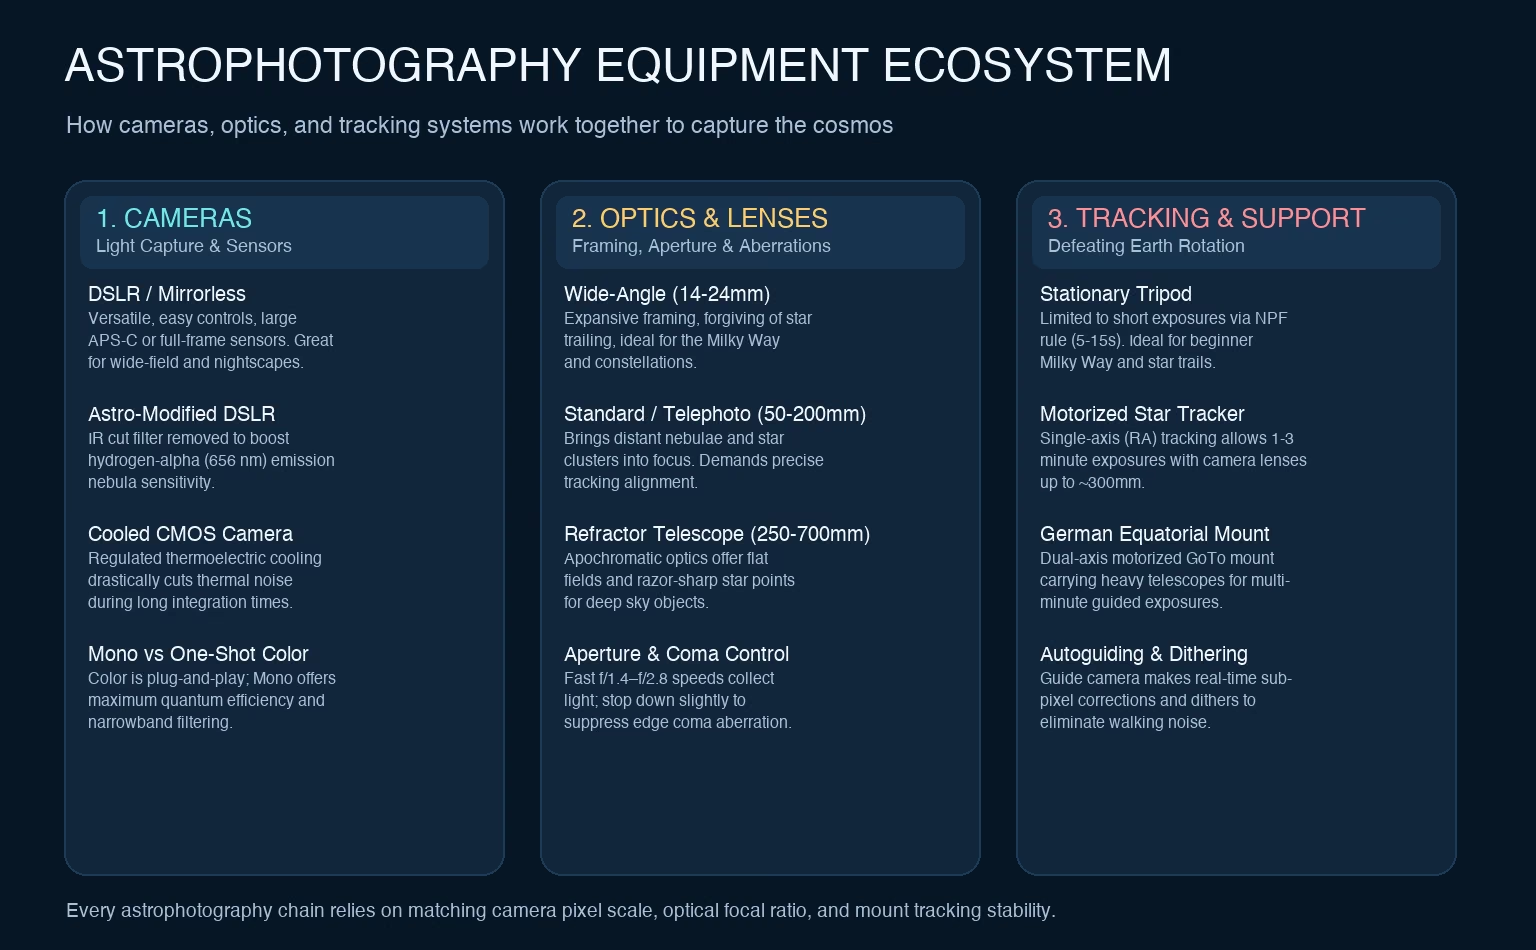
The camera captures the incoming light, the lens or telescope focuses it onto the sensor, and a stable support or motorized tracking mount keeps the imaging system properly positioned. Together, these components determine which objects you can photograph, how they appear in the frame, and how successfully you can record faint detail.
The good news is that a telescope, cooled astronomy camera, and computerized mount are not essential for your first session. A conventional DSLR or mirrorless camera, a suitable lens, and a sturdy tripod can already produce compelling Milky Way landscapes, constellations, and star trails. More specialized equipment becomes useful as you pursue smaller or fainter targets. Nikon’s night-sky photography guidance demonstrates this progression using ordinary interchangeable-lens cameras. [1][2] turn860431search0turn860431search1
This guide explains how the equipment works, what its technical specifications mean, how to choose compatible components, and when to upgrade. It also provides practical exposure guidance, tracking procedures, troubleshooting methods, and equipment recommendations for different astronomical targets.
What Equipment Do You Need for Astrophotography?
The right equipment depends on what you intend to photograph. A Milky Way landscape requires a considerably wider field of view than a detailed photograph of Jupiter. A stationary tripod can record stars as points during sufficiently short exposures, while faint galaxies often benefit from longer total integration times and accurate celestial tracking.
For most beginners, it is more useful to understand the purpose of each component than to start with an expensive shopping list.
Essential equipment versus optional accessories
| Equipment | Primary function | Beginner priority |
|---|---|---|
| DSLR or mirrorless camera | Records astronomical light | Essential for conventional camera-based imaging |
| Camera lens | Collects and focuses light, determines framing | Essential |
| Sturdy tripod | Supports the camera without unwanted movement | Essential |
| Remote shutter or intervalometer | Triggers exposures without touching the camera | Useful |
| Portable star tracker | Compensates for apparent stellar motion | Optional initially |
| Equatorial mount | Supports and tracks heavier imaging systems | For more demanding imaging |
| Dew heater | Prevents condensation on optical surfaces | Weather-dependent |
| Autoguiding equipment | Measures and corrects tracking deviations | Advanced or longer-focal-length systems |
| Dedicated astronomy camera | Provides specialized image acquisition capabilities | Optional upgrade |
| Filters | Select or restrict incoming wavelengths | Target-dependent |
| Laptop or imaging controller | Automates acquisition, tracking, and equipment control | Setup-dependent |
A telescope is an optical system that can replace a photographic lens, rather than an obligatory accessory for every astrophotography setup. Likewise, an autoguider cannot compensate for poor focus, a weak tripod, or an unsuitable optical system. Each component solves a particular problem.
How equipment requirements depend on the target
Wide-field astrophotography emphasizes expansive regions of the sky. Photographers often combine stars and the Milky Way with mountains, buildings, trees, or other terrestrial subjects. Shorter focal lengths and stable tripods are especially useful for this style.
Deep-sky imaging focuses on nebulae, galaxies, and star clusters. These objects vary enormously in angular size and brightness. Some fill a wide camera frame, whereas others require a much narrower field of view. Tracking becomes increasingly important as exposures get longer and image scale becomes finer.
Lunar and planetary photography follows another approach. The Moon is relatively bright, allowing short exposures in many situations. Planetary photographers frequently record high-frame-rate video and stack selected frames to minimize the effects of atmospheric turbulence.
The result is an important principle: choose equipment according to the target, not simply according to the most impressive specification.
How Cameras, Lenses, and Tracking Systems Work Together
An astrophotography system depends on three interconnected processes: collecting light, recording that light, and maintaining the intended pointing direction. Improvements in one area cannot necessarily correct weaknesses in another.
For example, a high-resolution camera cannot recover detail blurred by incorrect focus. A large-aperture lens cannot prevent stars from trailing during an excessively long untracked exposure. Even an accurately aligned mount cannot overcome strong wind shaking an unstable tripod.
How the camera sensor records light
A digital image sensor consists of photosensitive pixels that accumulate electrical charge in response to incoming photons. After an exposure, the camera measures and converts this accumulated signal into image data. Astronomical objects that appear faint to the eye can become detectable because a sensor integrates light over time.
However, the recorded data contains more than the signal from the target. Read noise, thermally generated charge, sky brightness, and other sources contribute uncertainty or unwanted signal. Long exposures and image stacking help collect more useful data, but they must be balanced against sensor performance, sky conditions, and tracking accuracy. [3]
How a lens determines the image
The lens gathers and focuses incoming light onto the sensor. Its focal length determines the angular field of view, while its entrance pupil and optical transmission influence how much light reaches the sensor.
A short focal length can capture a broad section of the Milky Way. A longer focal length frames a smaller portion of the sky, making objects appear larger within the image. The lens must also form sharp stellar images across the frame, which can be difficult because stars reveal optical aberrations particularly clearly.
How tracking changes the exposure
Earth rotates relative to distant stars once in approximately one sidereal day, which is about 23 hours, 56 minutes, and 4 seconds. From a fixed terrestrial camera, this produces apparent stellar motion across the sensor.
An equatorial star tracker counteracts that motion by rotating the camera around an axis aligned parallel to Earth’s rotational axis. This makes longer exposures with relatively stationary star images possible, although imperfect alignment, mount errors, and atmospheric conditions still impose limits. Sky-Watcher describes this operating principle in its tracking-mount documentation. [4] turn165881search1turn165881search2
Tracking does not make the entire scene stationary. When the camera follows the stars, the landscape appears to move relative to the frame. That is why tracked nightscape photography often combines a tracked sky exposure with a separate, stationary foreground exposure.
Choosing the Right Camera for Astrophotography
Choosing a camera is one of the most consequential equipment decisions, but conventional photographic cameras are already capable of sophisticated night-sky imaging. Camera selection should account for the intended targets, sensor performance, RAW recording, available lenses, power requirements, and the ease of operating the camera in darkness.
DSLRs, mirrorless cameras, and dedicated astronomy cameras each have advantages. The key difference is not simply image quality, but how well each camera fits a particular imaging workflow.
image_group{“query”:
DSLR cameras for beginners
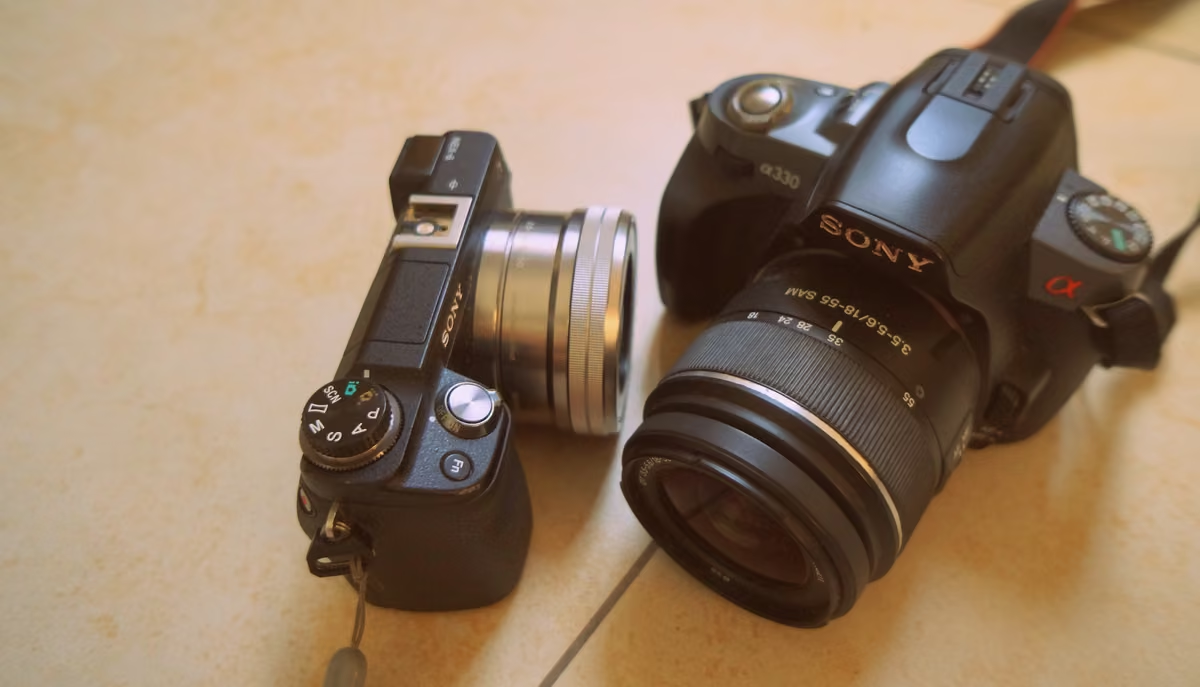
A digital single-lens reflex camera remains an excellent option for learning astrophotography. DSLRs offer manual exposure controls, interchangeable lenses, RAW image capture, and compatibility with common accessories such as intervalometers and tripod heads.
The optical viewfinder is not particularly useful for focusing on faint stars, so photographers generally rely on live view and magnification to adjust focus. DSLRs also have mechanical components and can require careful battery management during long imaging sessions.
An older DSLR should not automatically be dismissed. In a February 2025 Astronomy Magazine guide, astrophotographer Molly Wakeling described successfully recording the Milky Way with an entry-level Nikon DSLR and its kit lens. The example illustrates how technique, exposure planning, and stacking can matter more than purchasing new equipment immediately. [2] turn752969search0
Mirrorless cameras for night-sky photography
Mirrorless cameras use an electronic viewing system rather than a DSLR’s reflex mirror mechanism. Many models provide magnified live view, focus peaking, exposure simulation, electronic shutter options, and other aids useful for composing and focusing under low light.
Their smaller bodies can make them attractive for portable tracking setups, although body size, battery capacity, and lens weight vary substantially. Because modern mirrorless cameras cover many sensor formats and price levels, their actual suitability should be evaluated model by model.
One practical consideration is the lens ecosystem. Native lenses can be convenient, while adapted lenses may offer economical options if the adapter preserves the appropriate flange distance and provides the required mechanical or electronic compatibility.
Dedicated astronomy cameras
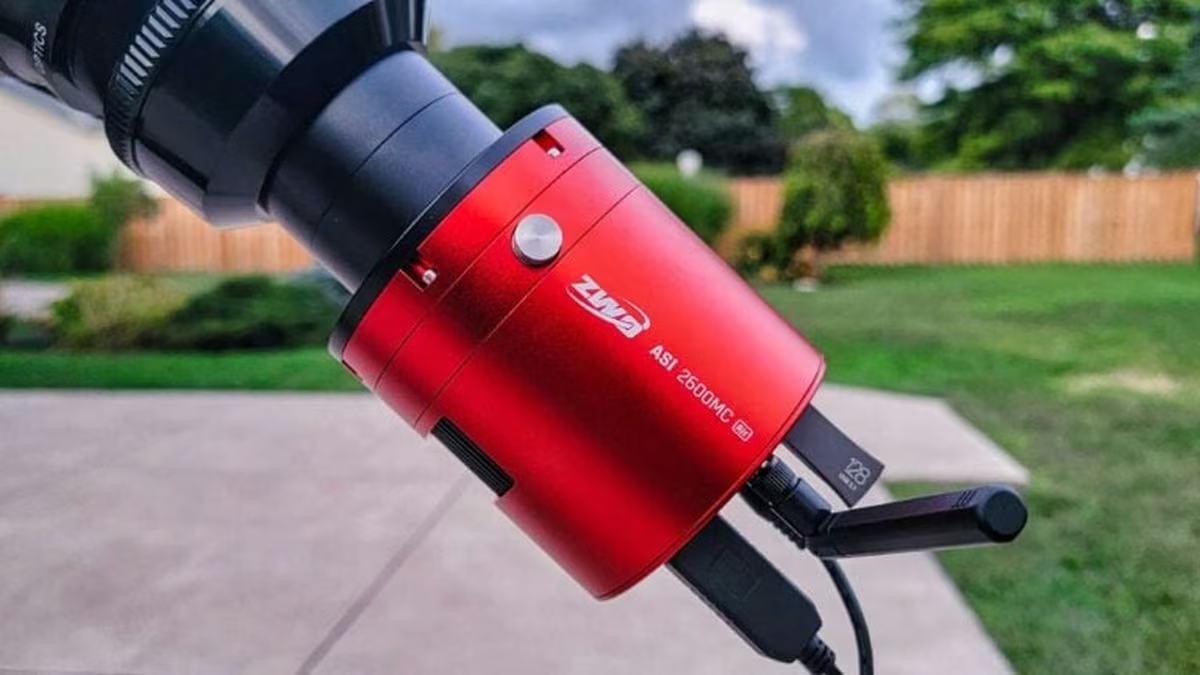
A dedicated astronomy camera is designed primarily to record astronomical data rather than operate as a conventional handheld camera. Depending on the model, it may provide active cooling, specialized acquisition modes, high-speed video, or a monochrome sensor.
Cooled deep-sky cameras regulate sensor temperature to reduce thermal dark current and make image calibration more repeatable. However, active cooling adds power requirements, and many astronomy cameras require a computer or dedicated controller. Not every astronomy camera is cooled, and a cooled sensor does not eliminate read noise or sky-background noise.
These cameras are most useful when the photographer has a relatively established telescope or lens-based system and wants greater control over repeated astronomical exposures.
image_group{“query”:
One-shot color versus monochrome cameras
A one-shot color camera records different color channels through a color filter array, commonly a Bayer pattern. Each filtered pixel detects only part of the visible spectrum, and the resulting raw data is processed through a procedure called demosaicing or debayering to reconstruct a full-color image.
A monochrome camera records intensity without a Bayer color filter array. To create a conventional color image, photographers generally capture separate exposures using filters, such as red, green, and blue. Monochrome imaging also offers flexibility for narrowband emission-line photography.
The tradeoff is workflow complexity. Monochrome systems often require multiple filter exposures, a filter wheel, and additional calibration, while one-shot color cameras simplify acquisition. A 2026 comparison published by Astronomy Magazine discusses these practical differences. [5] turn768467search0
| Camera type | Main advantage | Main limitation | Typical use |
|---|---|---|---|
| DSLR | Familiar operation and extensive lens compatibility | Body-specific noise, focusing, and power limitations | Nightscapes and beginner deep-sky |
| Mirrorless | Modern focusing and acquisition features | Model-dependent battery, heating, and lens considerations | Nightscapes and versatile astronomical imaging |
| Cooled OSC camera | Regulated sensor temperature and convenient color capture | Requires additional power and acquisition control | Deep-sky imaging |
| Monochrome camera | Flexible filtered imaging and channel control | More equipment and processing complexity | Advanced deep-sky and narrowband |
| High-frame-rate planetary camera | Rapid acquisition of short exposures | Usually narrow field of view and specialized workflow | Moon and planets |
Camera Sensor Size, Resolution, and Noise Explained
Sensor specifications matter because astronomical imaging frequently operates close to the limits of available light. However, no single specification predicts overall performance. Sensor area, pixel characteristics, optics, exposure strategy, and sky brightness all contribute to the final image.
Full-frame, APS-C, and Micro Four Thirds sensors
Full-frame sensors are approximately 36 × 24 mm, matching the dimensions of traditional 35 mm still-photography film. APS-C and Micro Four Thirds sensors record smaller areas of the image projected by a given lens.
With the same lens and camera position, a smaller sensor captures a narrower portion of the scene. This is commonly described using crop factor. A 24 mm lens on a camera with a 1.5× crop factor records approximately the same field of view as a 36 mm lens on a full-frame camera, assuming comparable aspect ratios.
Crop factor does not change the actual focal length of the lens. A smaller sensor can be useful when framing compact targets, but it does not automatically provide more optical resolution or gather more light from those targets.
A larger sensor offers potential advantages in total light collection when comparing equivalent framing and exposure conditions, but performance also depends on sensor technology, sampling, and lens coverage.
Pixel size, resolution, and image scale
Sensor resolution describes the number of pixels available to record the image, whereas pixel pitch describes their physical spacing. Both become important when choosing a camera for a particular focal length.
A useful approximation for astronomical image scale is:
Here, p is the pixel pitch in micrometers, f is focal length in millimeters, and the result is expressed in arcseconds per pixel.
For example, a camera with 4 µm pixels connected to a 400 mm optical system has an image scale of approximately 2.06 arcseconds per pixel. This calculation helps describe how finely the camera samples the sky. It does not establish whether the system can actually resolve features at that scale, because optical quality, atmospheric seeing, tracking, and focus also matter.
Quantum efficiency, read noise, and dark current
Quantum efficiency describes the fraction of incoming photons at a specified wavelength that produce detectable charge in the sensor. Higher quantum efficiency can improve signal collection, but its wavelength dependence makes a single maximum specification insufficient for comparing all imaging applications.
Read noise is uncertainty introduced during sensor measurement and conversion. Dark current is thermally generated charge accumulating even without incident light. In long exposures, dark current and its statistical variation can become important, particularly at high operating temperatures.
Cooling reduces dark current, while calibration frames help remove repeatable offsets and patterns. Calibration does not remove the random shot noise associated with thermal charge. Sky & Telescope explains the roles of dark and flat calibration frames in astronomical imaging. [3] turn860431search2
Dynamic range, full-well capacity, and bit depth
Full-well capacity describes the charge a pixel can hold before saturation. Dynamic range relates the maximum measurable signal to the system’s noise floor, while bit depth describes the number of digital levels used to represent recorded data.
These characteristics become especially noticeable when imaging bright stars embedded in faint nebulosity. Exposure settings that preserve extremely faint details may saturate bright star cores. Taking shorter and longer exposures can help retain detail across a wider brightness range, provided the data is combined appropriately.
Why a higher ISO does not collect more light
ISO is frequently misunderstood in astrophotography. Increasing the ISO setting does not make additional photons enter the lens or strike the sensor. It changes how the recorded signal is amplified or represented, depending on the camera’s design.
A higher ISO can reduce certain downstream electronic limitations in some cameras, but it can also reduce highlight headroom. The ideal setting varies with sensor behavior, exposure duration, sky brightness, and the specific camera.
For beginners, a moderate-to-high ISO can be a practical starting point for untracked Milky Way photography, but the final choice should be determined through exposure testing and inspection of RAW data rather than a universal rule.
Choosing the Best Lens for Astrophotography
The lens is as important as the camera because it determines how much sky enters the frame, how incoming light is focused, and whether stars remain sharp at the edges. A camera with an excellent sensor can still produce disappointing images if its lens introduces severe optical distortions or cannot be focused accurately.
Photographers should consider focal length, maximum aperture, optical quality, mechanical stability, and the weight of the lens. The most suitable lens depends on whether the target is a wide nightscape, a constellation, a nebula, or a compact celestial object.
image_group{“query”:
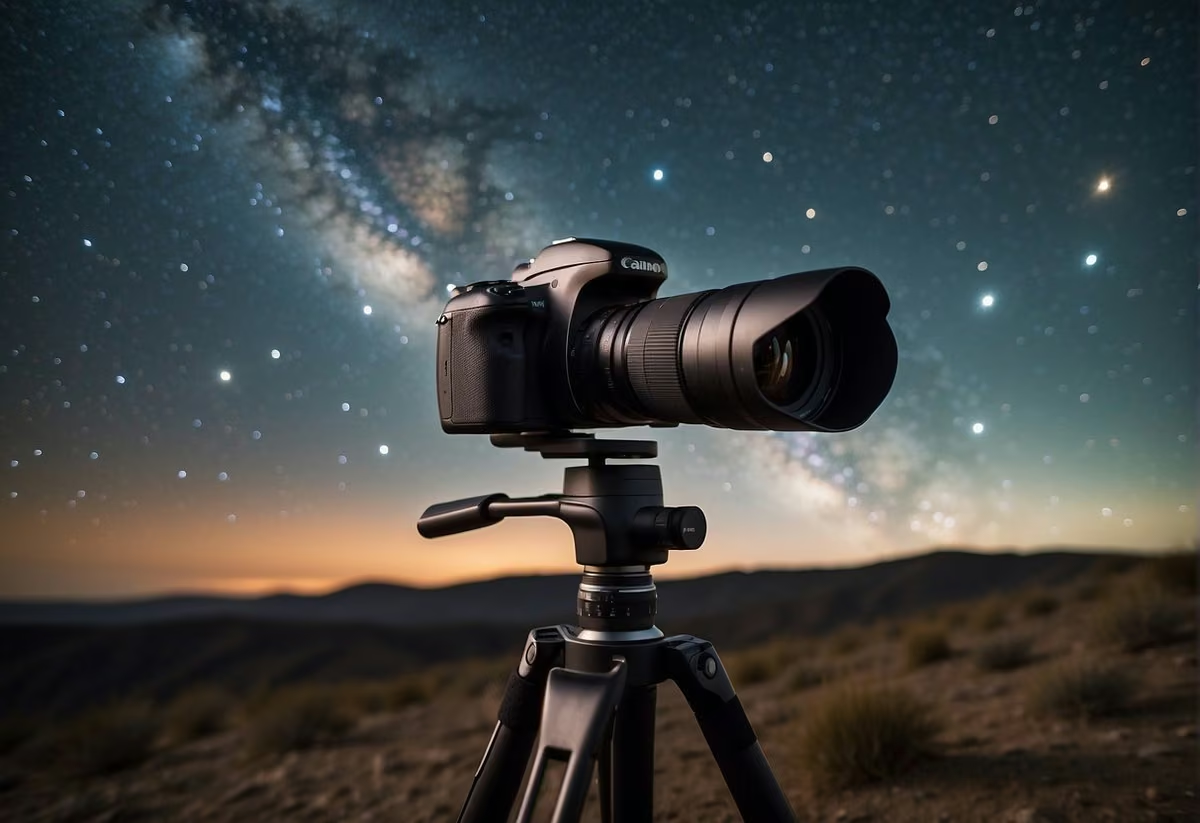
Wide-angle lenses for the Milky Way
Wide-angle lenses are popular because they record large sections of the night sky while allowing comparatively longer untracked exposures before stellar movement becomes noticeable.
For full-frame cameras, lenses around 14 to 35 mm are useful starting options for many nightscape compositions. A wide maximum aperture, such as f/2.8 or faster, helps collect enough light during short exposures, but actual performance at maximum aperture varies by lens.
A wide-angle lens also makes it easier to include a compelling foreground. The Milky Way can be composed above a landscape rather than appearing as an isolated band of stars. Sky & Telescope describes wide and relatively fast lenses as practical choices for nightscape photography. [6] turn790789search6turn790789search0
Standard and telephoto lenses
Standard lenses, such as 35 mm and 50 mm focal lengths, provide narrower framing than ultra-wide lenses. They can be useful for constellations, selected Milky Way regions, and broad stellar fields, particularly when paired with a tracker.
Telephoto lenses allow smaller astronomical regions to occupy more of the sensor. Lenses around 85 to 200 mm can frame certain large nebulae, star clusters, or regions around the Andromeda Galaxy. Longer telephoto lenses may be appropriate for the Moon and smaller celestial targets.
However, longer focal lengths make star movement, vibration, focus errors, and mount tracking imperfections more visible. A telephoto lens that works well for daytime wildlife photography is not necessarily an easy tool for long-exposure astrophotography.
Prime lenses versus zoom lenses
Prime lenses have fixed focal lengths, while zoom lenses offer a range of focal lengths in one optical assembly. Prime lenses often provide access to wide maximum apertures, although this does not guarantee better optical quality than every zoom.
Zoom lenses are convenient for composing different astronomical regions without changing optics. Their variable focal length can also help photographers find suitable framing before committing to an imaging session.
For astrophotography, an appropriate test is more valuable than a general statement that one type is better. Compare stars at the center and corners, note the useful aperture range, and inspect whether focusing or zooming changes the composition during a long sequence.
Understanding lens aperture and focal ratio
The f-number of a lens is the focal length divided by the diameter of its entrance pupil. For example, a 50 mm lens operating at f/2 has an entrance pupil of approximately 25 mm.
A lower f-number generally means greater image-plane illumination for an extended scene, assuming similar optical transmission. Moving from f/4 to f/2.8 represents approximately one stop, or about twice the light per unit sensor area for the same exposure duration.
For a given target, however, total signal also depends on aperture diameter, image scale, sensor area, and the optical configuration. This is particularly important when comparing camera lenses with telescopes.
Can a basic kit lens work?
Yes. A typical kit zoom may have a smaller maximum aperture than a specialized nightscape lens, but it can still record the brightest regions of the Milky Way, constellations, and star trails.
Beginners should begin with the shortest available focal length, use the widest aperture that gives acceptable image quality, focus carefully, and test exposure durations. Multiple exposures can be stacked later to improve the appearance of faint structures.
A practical limitation is that inexpensive kit zooms may exhibit significant corner aberrations or relatively slow apertures. Nevertheless, these limitations are useful for learning when a lens upgrade would actually improve results. [2]
Focal Length and Field of View in Astrophotography
Field of view describes how much of the sky is captured in one image. It depends on the camera’s sensor dimensions and the optical system’s effective focal length.
For a rectilinear lens, the horizontal angular field of view can be approximated by:
Here, w is sensor width and f is focal length, with both measured in the same units.
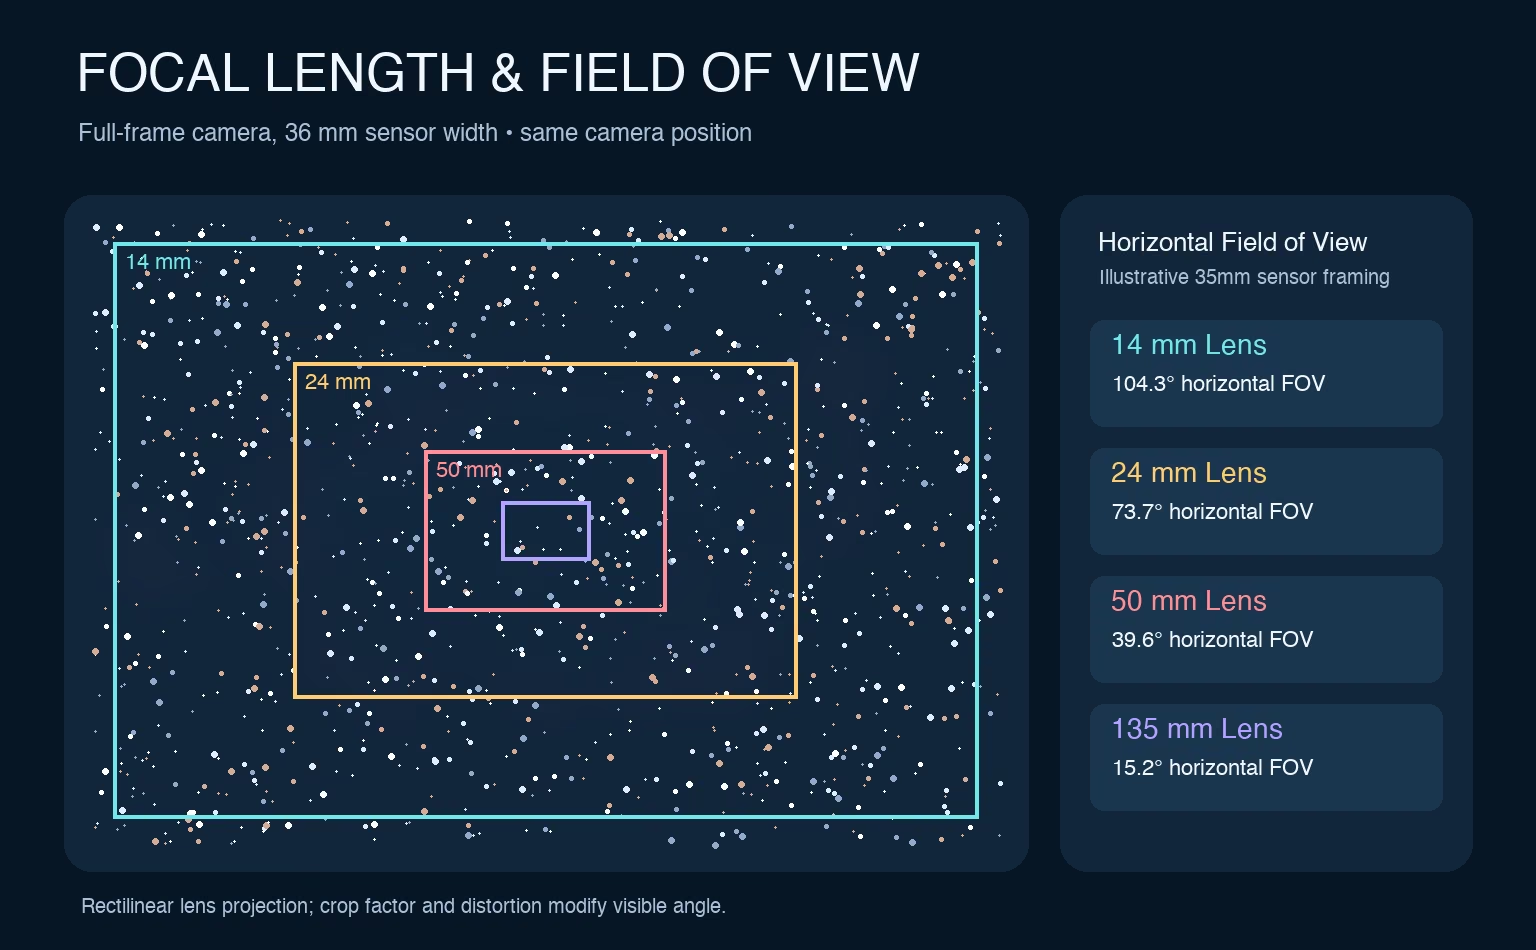
How focal length changes astronomical framing
Using the same full-frame sensor, a 14 mm lens provides a horizontal field of view of approximately 104.3°, while a 50 mm lens covers approximately 39.6°. A 135 mm lens narrows the horizontal coverage to about 15.2°.
These differences make certain lenses better suited to particular compositions. A very wide field is valuable when the surrounding landscape is important, whereas a telephoto lens can isolate a celestial target.
Before buying a lens, use a field-of-view calculator or planetarium tool to compare the lens and sensor with the apparent angular size of the target. Some well-known nebulae are surprisingly large, while many galaxies occupy only a small fraction of a wide-angle image.
Why image scale matters as much as field of view
Two systems can photograph the same target but record different levels of usable detail. A longer focal length increases the apparent image scale, yet excessive magnification can spread the signal across too many pixels without revealing additional meaningful structure.
The correct combination depends on atmospheric seeing, optical resolution, pixel pitch, and tracking precision. High-resolution sensors are valuable only when the rest of the imaging system supports their sampling requirements.
For beginners, a field of view that comfortably includes the target is often more useful than attempting to maximize magnification.
Optical Aberrations: Why Stars Become Distorted
Stars provide demanding tests of lens performance because they approximate point sources of light. Small optical imperfections that are difficult to notice in ordinary photographs can become obvious when examining star shapes at high magnification.
The most important problems include coma, astigmatism, chromatic aberration, spherical aberration, field curvature, and vignetting. Their visibility depends on lens design, aperture, focus, sensor coverage, and image position.
image_group{“query”:
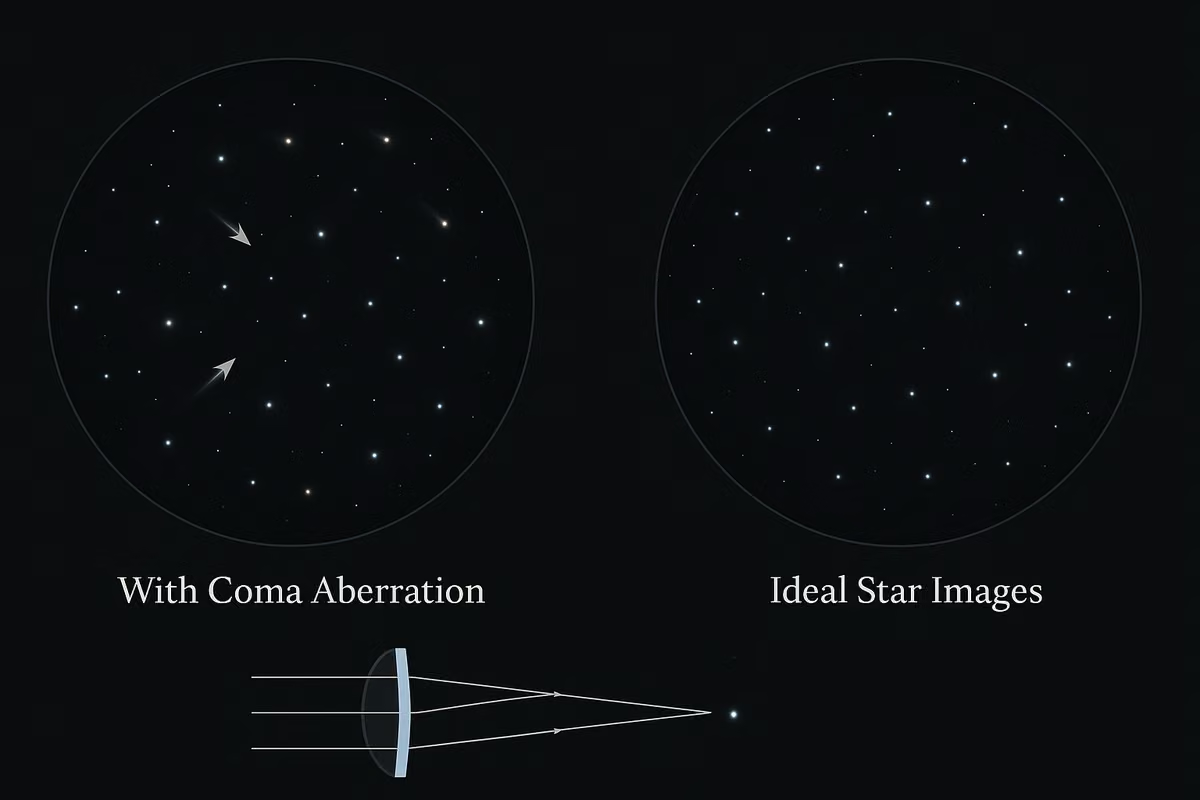
Coma, astigmatism, and field curvature
Coma causes off-axis point sources to develop asymmetric, comet-like shapes. Astigmatism can produce stars that appear stretched in different directions depending on the focal plane. Field curvature means the best-focus surface is curved, so the frame center and corners may not be equally sharp at one focus setting.
Stopping a lens down can reduce some aberrations, but it does not guarantee their elimination. Different lenses respond differently, and improvements in edge sharpness come at the cost of reduced illumination.
Sky & Telescope documents these problems in its technical guidance on choosing lenses for nightscape photography. [6] turn790789search0
Chromatic aberration and colored star halos
Chromatic aberration occurs because an optical system does not focus or magnify every wavelength of light in exactly the same way. In astrophotography, this can produce blue, violet, red, or green fringes around bright stars.
Axial chromatic aberration can affect the image across the field, while lateral chromatic aberration becomes more visible away from the center. Nikon explains these two forms of aberration in its optical terminology documentation. [17] turn790789search10
Some colored halos may also come from filters, reflections, sensor characteristics, or processing, so the presence of a halo does not automatically prove that the lens is responsible.
Vignetting and corner darkness
Vignetting describes reduced brightness toward the edges of an image. It may be produced by the optical design, physical obstructions, or an insufficient image circle. Wide-aperture lenses often exhibit more noticeable light falloff at their maximum aperture.
Flat-field calibration and lens corrections can compensate for certain types of vignetting. However, increasing the brightness of severely darkened corners can also reveal noise. Mechanical vignetting may become particularly troublesome when filters, adapters, or lens hoods obstruct the light path.
How to evaluate a lens using the stars
Mount the camera securely, focus on a bright star, and record RAW test frames at several aperture settings. Examine the center, middle, and corners at consistent magnification.
Compare star shape, color fringing, brightness uniformity, and focus consistency. Repeat if the test was affected by wind, tracking errors, or an inaccurate focus setting.
A lens that performs exceptionally at f/2.8 may produce better usable astrophotography results than a faster lens that must be stopped down substantially to control distorted stars.
Why Stars Trail During Long Exposures
Star trailing is one of the first technical challenges beginners encounter. A photograph taken with a stationary camera may initially show sharp star points, but as the exposure continues, Earth’s rotation causes each star’s image to move across the sensor.
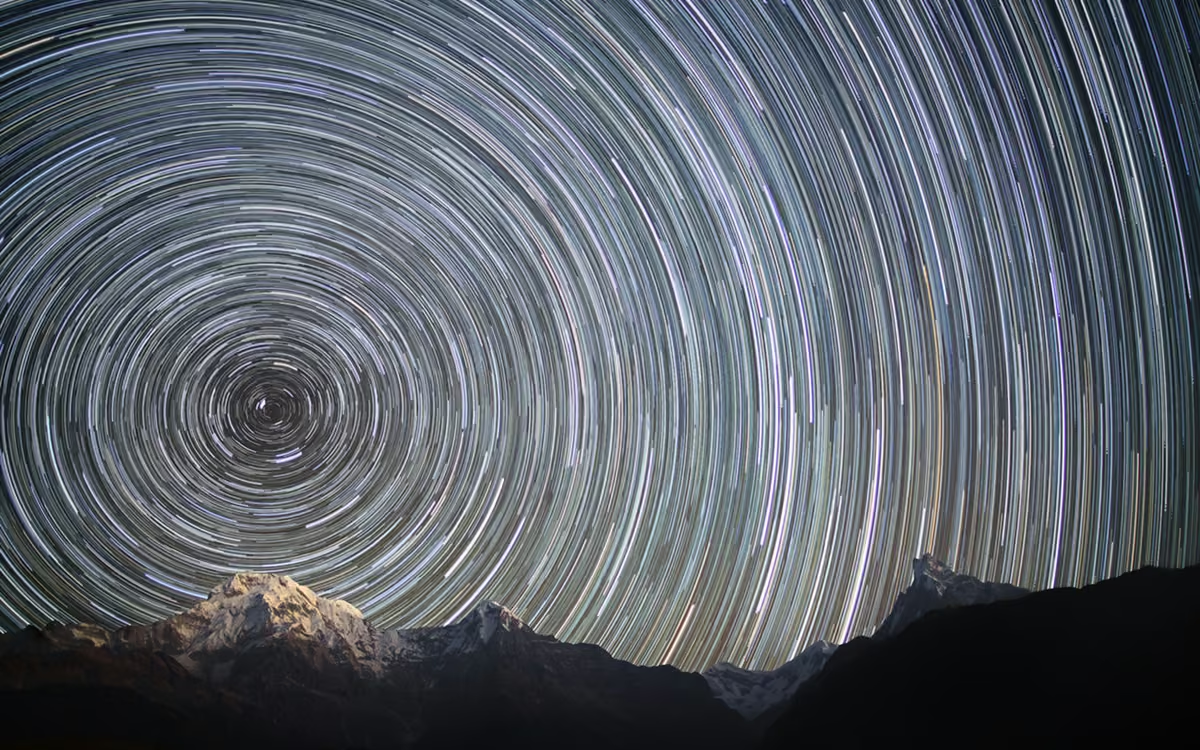
The effect becomes more noticeable with longer exposures, longer focal lengths, and finer image sampling. Star trails are not necessarily a mistake. They can also be used deliberately to produce photographs revealing the apparent rotation of the celestial sphere.
image_group{“query”:
Understanding the 500 Rule
The 500 Rule is a traditional approximation for estimating a maximum exposure duration before visible star trailing becomes objectionable. It divides 500 by the lens’s full-frame-equivalent focal length.
Here, t is the estimated exposure in seconds, f is focal length in millimeters, and c is crop factor.
For a 24 mm lens on a full-frame camera, the approximation produces about 20.8 seconds. For the same focal length on a camera with a 1.5× crop factor, it produces about 13.9 seconds.
However, this formula is not a reliable guarantee of pinpoint stars. It ignores pixel pitch, aperture, stellar declination, and the degree of enlargement at which the image will be viewed. Modern high-resolution cameras can reveal trailing at much shorter exposures.
Why the NPF Rule is more useful
The NPF Rule provides a more detailed exposure estimate by considering factors including sensor pixel characteristics, focal length, aperture, and the declination of the photographed stars.
PhotoPills includes both the traditional 500 Rule and the NPF approach in its Spot Stars calculator. The company specifically notes the limitations of the simpler rule for photographers seeking sharp point-like stars. [7] turn768467search4
Neither rule replaces testing. The relevant exposure duration depends partly on how much elongation the photographer considers acceptable. For precise imaging, inspect test frames at full resolution rather than relying exclusively on a calculated shutter speed.
Intentional star-trail photography
Photographing star trails is different from attempting to eliminate them. A fixed camera records the apparent motion of stars, which can be combined into circular arcs when pointed near a celestial pole.
Photographers often capture a long sequence of shorter exposures and combine them using star-trail stacking software. This approach avoids some problems associated with one extremely long exposure, including sensor heating and overexposed sky backgrounds.
A sturdy tripod, remote shutter control, appropriate framing, and sufficient battery capacity matter more than a motorized tracker for this particular technique. Nikon’s dedicated star-trail photography guidance discusses using successive exposures and a stationary camera. [12] turn860431search4
What Is a Star Tracker and How Does It Work?
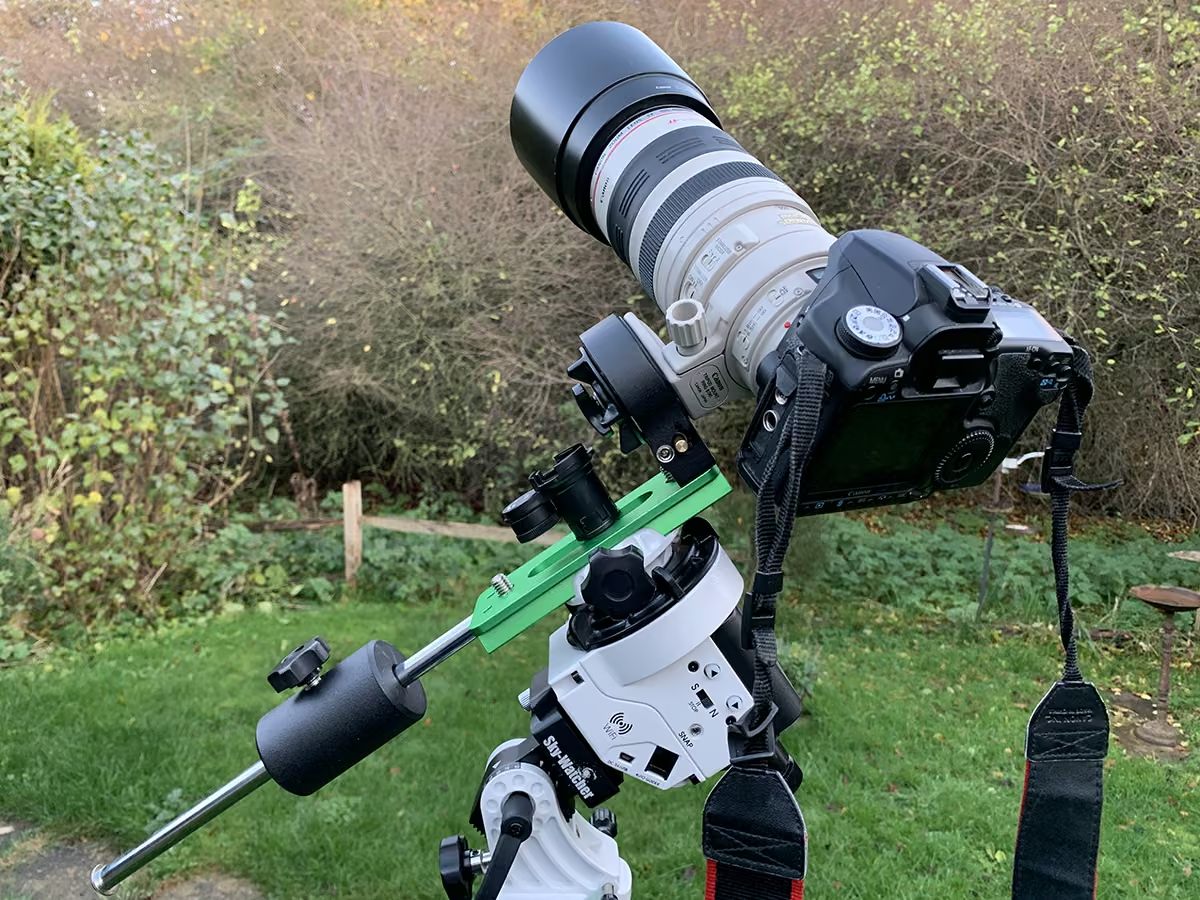
A star tracker is a motorized mount designed to compensate for the apparent motion of the stars caused by Earth’s rotation. It allows a camera or small telescope to follow a celestial target more closely during extended exposures.
A typical portable star tracker sits between the tripod and the camera mounting head. Its tracking axis is aligned with Earth’s rotational axis so that motorized rotation can counter the sky’s apparent sidereal motion.
Unlike an ordinary tripod head, a correctly aligned star tracker moves continuously while the shutter is open.
image_group{“query”:
Sidereal tracking and Earth’s rotation
The sidereal rate is based on Earth’s rotation relative to distant stars rather than the Sun. An appropriately aligned equatorial mount rotates its right-ascension axis at approximately one full turn per sidereal day, in the direction required to counter Earth’s rotation.
This allows distant stars to remain approximately fixed on the sensor while the mount follows the sky. The result is more time to accumulate faint signals without the same degree of motion blur found in long untracked exposures.
A tracker cannot correct for all motion. Poor polar alignment, tracking errors, atmospheric refraction, and equipment vibration can still affect the image.
Single-axis versus dual-axis tracking
A single-axis tracker drives the right-ascension axis. With sufficiently accurate polar alignment, this can work well for wide-field photography and moderate focal lengths.
A dual-axis equatorial mount can move in both right ascension and declination. This provides additional capabilities for GoTo pointing, framing adjustments, and supported autoguiding corrections.
A dual-axis mount is not automatically more accurate than every single-axis tracker. Mechanical quality, balancing, polar alignment, control electronics, and the mounted equipment determine practical performance.
Payload capacity and equipment balance
Mount specifications commonly include a maximum payload. For example, Sky-Watcher lists an 11 lb, approximately 5 kg, payload capacity for its Star Adventurer GTi mount. That figure is a manufacturer rating, not a guarantee that every configuration up to the limit will deliver equally sharp long-exposure images. [13] turn165881search1
The camera, lens, mounting bracket, and accessories all contribute to the carried load. Long telephoto lenses can also create mechanical leverage and place greater demands on mount rigidity.
Good balance reduces unnecessary strain on drive components, but balancing alone cannot eliminate periodic error or insufficient tracking precision.
When is a star tracker worth buying?
A tracker is worth considering when untracked exposure durations become the limiting factor in your photographs. This commonly happens when attempting to record fainter Milky Way detail, photograph large nebulae through telephoto lenses, or accumulate long sequences of deep-sky exposures.
For someone primarily interested in short-exposure landscapes, meteor showers, or intentional star trails, a tracker may provide little immediate benefit.
A realistic buying decision should consider how often it will be used, portability, polar alignment requirements, payload, compatibility, and whether the intended focal lengths are within the mount’s practical capabilities.
Equatorial Mounts, GoTo Systems, and Field Rotation
As a photographer progresses toward longer focal lengths and heavier optical systems, a more substantial mount often becomes necessary. German equatorial mounts are commonly used because they can follow celestial motion with a single driven axis when correctly polar aligned.
However, the distinction between equatorial mounts, altitude-azimuth mounts, and GoTo systems is frequently misunderstood.
image_group{“query”:
German equatorial mounts
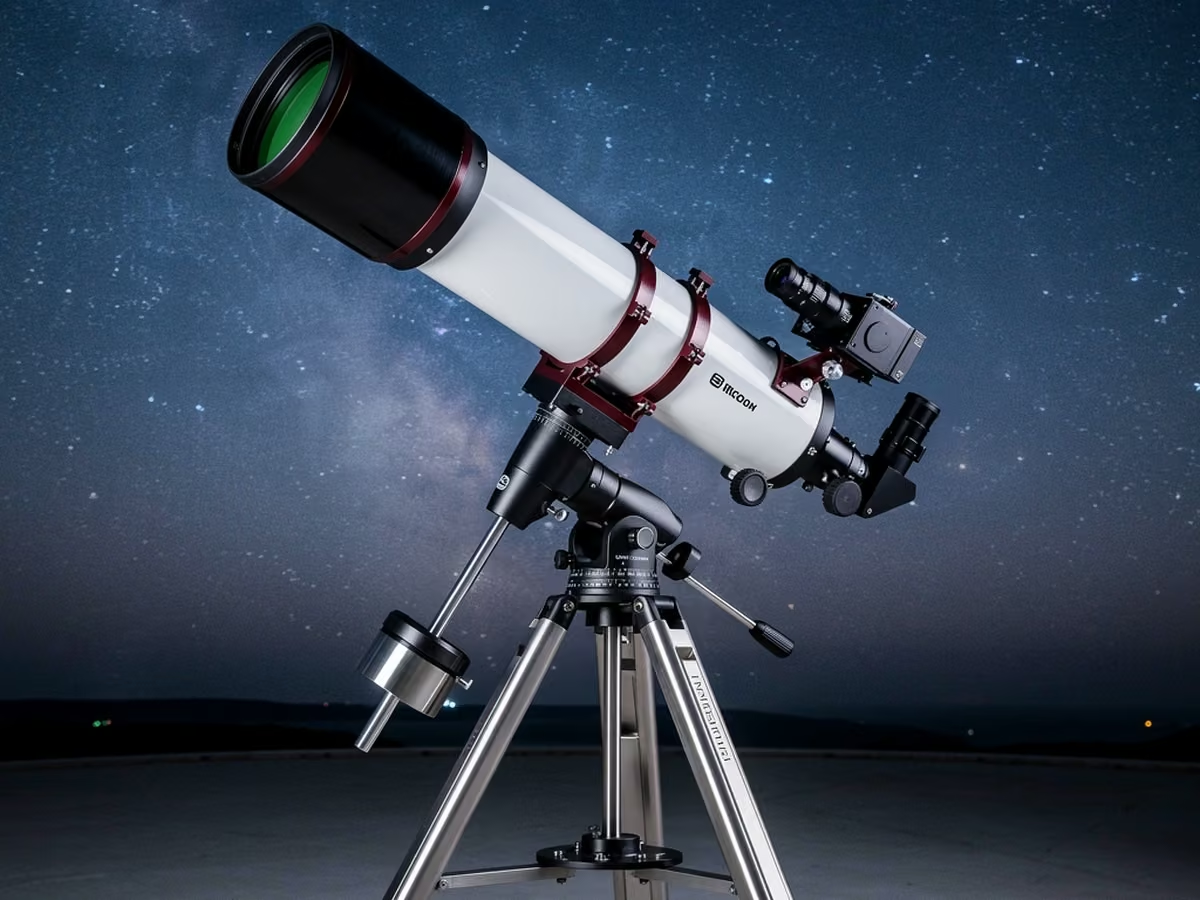
A German equatorial mount, or GEM, uses two primary rotational axes: right ascension and declination. Its geometry allows the right-ascension axis to be aligned parallel to Earth’s rotational axis.
A counterweight system balances the telescope and attached imaging equipment. This arrangement is commonly used for deep-sky photography because it supports celestial tracking, automated pointing, and guiding accessories.
Mount capacity, drive performance, and tracking accuracy vary substantially between models. A larger mount can carry heavier equipment, but it also introduces greater transport, setup, and power requirements.
Altitude-azimuth mounts and field rotation
An altitude-azimuth mount moves in altitude, up and down, and azimuth, around the horizon. Computerized versions can keep an astronomical target centered by coordinating both axes.
However, an ordinary alt-azimuth tracking arrangement does not keep the surrounding star field at a constant orientation relative to the sensor. Over time, stars appear to rotate around the tracked point. This effect is called field rotation.
Field rotation becomes an important limitation for long-exposure deep-sky imaging, although short planetary exposures and electronically assisted astronomy can often work successfully with alt-azimuth mounting.
A compatible equatorial wedge or image derotator can address the geometrical issue in appropriate systems. Celestron explains field rotation and the distinction between equatorial and alt-azimuth tracking in its technical documentation. [8] turn768467search1turn768467search7
GoTo pointing versus accurate tracking
GoTo is a computerized pointing function that moves a mount toward celestial coordinates or selected objects. It helps users locate targets, often through a handheld controller or astronomy application.
Tracking is the continuous movement required to follow apparent celestial motion. Polar alignment is the geometric procedure used to orient an equatorial mount’s tracking axis.
These are separate functions. A GoTo mount can locate an object even when its polar alignment is not sufficiently accurate for long exposures. Conversely, a basic tracker without GoTo can produce excellent results after careful alignment.
Periodic error, backlash, and vibration
Mechanical tracking systems experience imperfections. Periodic error is often associated with repeating drive-gear inaccuracies, while backlash describes lost motion when a gear system reverses direction.
These effects can cause the target to drift across the image even when the nominal tracking speed is correct. Wind, cable tension, and tripod vibration introduce additional disturbances.
Autoguiding and periodic-error compensation can reduce some tracking errors, but the best approach begins with a mechanically stable, well-balanced, and correctly aligned system.
Polar Alignment Explained: How to Set Up a Star Tracker
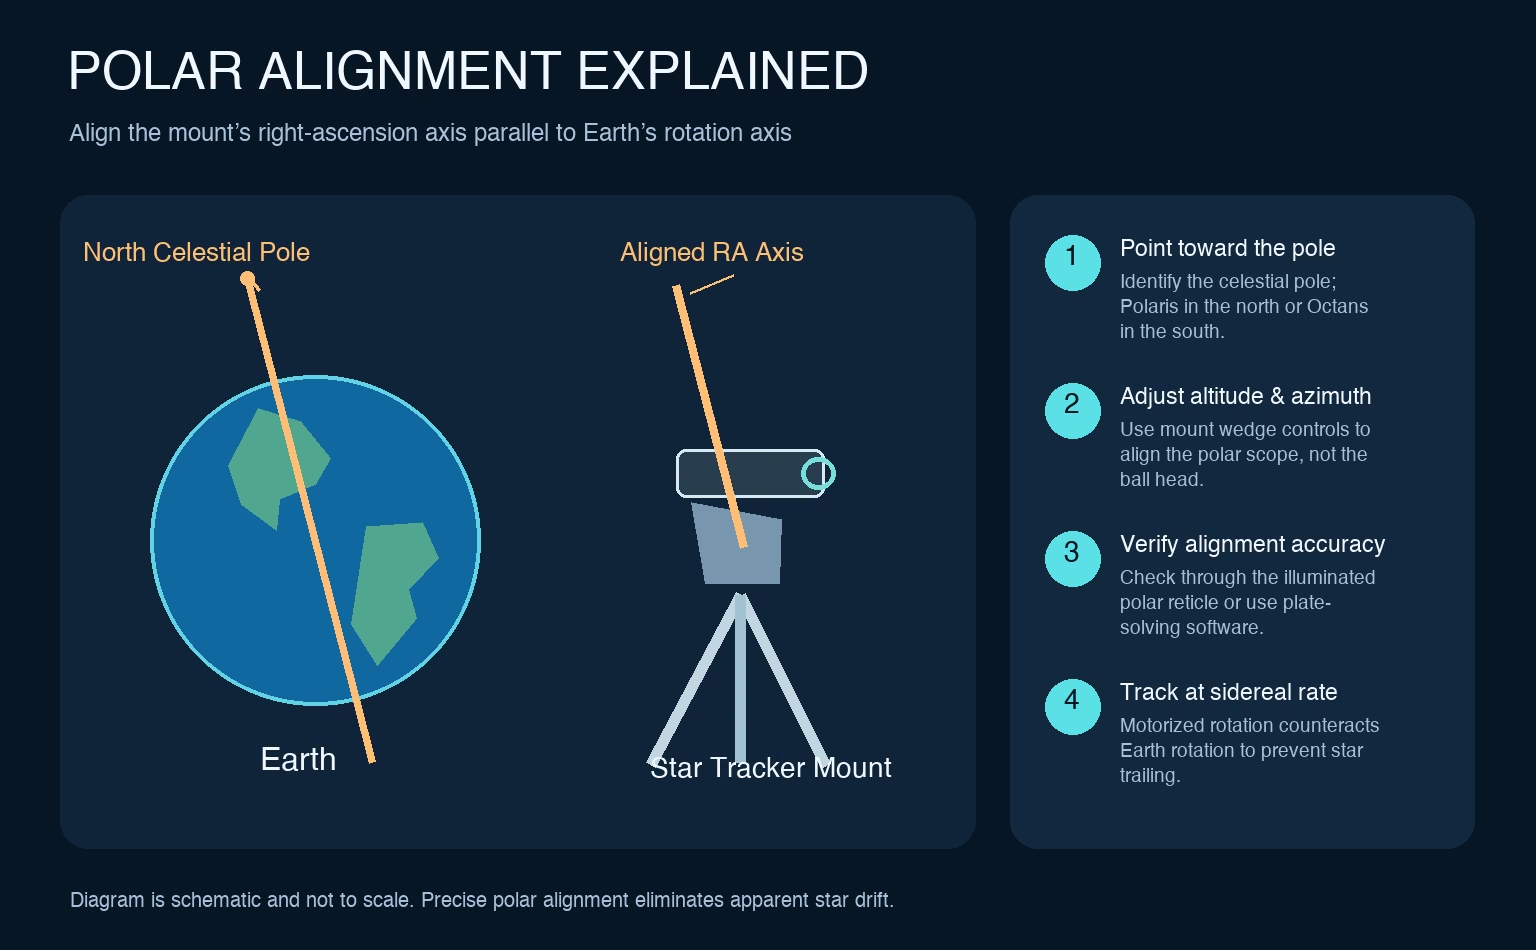
Polar alignment is the procedure used to orient an equatorial mount’s right-ascension axis parallel to Earth’s axis of rotation. It is essential for obtaining consistent tracking during longer exposures.
In the Northern Hemisphere, Polaris is a useful reference star because it lies close to the north celestial pole. However, the star is not exactly at the pole, and accurate alignment requires accounting for that offset.
Preparing the tripod and mount
Start by placing the tripod on firm, stable ground. Extend the legs only as much as required and secure every connection. Mount the equatorial head according to its manufacturer’s instructions, then install the camera or telescope and the appropriate counterweights.
Orient the mount approximately toward the relevant celestial pole. Adjust the mount’s latitude setting to match the observing location, if applicable to the design.
Tripod leveling can simplify subsequent adjustments, although the exact importance depends on the mount geometry and alignment method. Protect the tripod from accidental contact after alignment.
Using a polar alignment scope
A polar scope is a small optical instrument aligned with the mount’s right-ascension axis. Its reticle provides a reference for positioning the celestial pole relative to nearby stars.
For Northern Hemisphere setups, Polaris is placed at a calculated location within the reticle rather than automatically centered. The correct position changes with date and time because of Earth’s rotation.
Southern Hemisphere observers generally use different reference stars or assisted alignment methods because there is no comparably bright star precisely marking the south celestial pole.
Follow the instructions for the specific mount and reticle design. Sky-Watcher provides polar-alignment procedures for its equatorial tracking products. [4]
Plate solving and software-assisted alignment
Plate solving identifies the celestial coordinates of an image by matching recorded star patterns with a reference catalog. Some astrophotography applications use this capability to measure and improve polar alignment.
The process typically involves capturing images, analyzing the mount’s pointing geometry, and making adjustments to the mount’s altitude and azimuth controls.
Software-assisted methods can be especially useful when a traditional polar scope is awkward to use, although they require compatible equipment and an adequate view of the sky.
Drift alignment and alignment verification
Drift alignment measures how selected stars move over time when the mount is tracking. By observing declination drift in different regions of the sky, photographers can determine which mechanical adjustments are needed to reduce polar alignment error.
This technique can refine an existing alignment without relying solely on a polar scope. It takes more time than approximate alignment but is useful in demanding imaging applications.
After alignment, test the mount with exposures at the intended focal length. If stars still elongate, investigate tracking quality, balance, and vibration before assuming that polar alignment is the only problem.
Autoguiding: Improving Tracking Accuracy
Autoguiding is a method of measuring and correcting mount tracking errors during astronomical imaging. It uses a camera to monitor one or more stars and software to calculate whether the tracked position has shifted.
Autoguiding is especially useful for systems where small tracking deviations become visible during long exposures. It does not replace proper polar alignment, good balance, or a mechanically suitable mount.
image_group{“query”:
Guide scopes and off-axis guiders
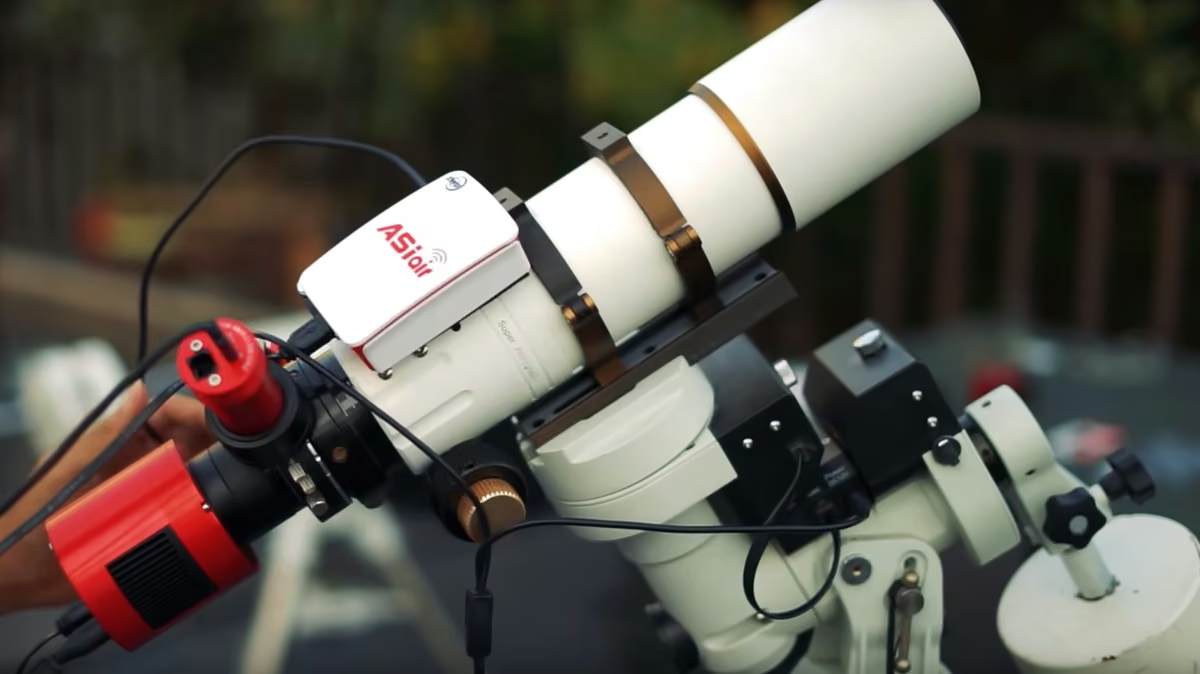
A guide scope is a small additional telescope mounted alongside the primary imaging optics. A guide camera records stars through this smaller optical system while the main camera photographs the chosen target.
An off-axis guider instead uses a small prism to redirect part of the main telescope’s light toward the guide camera. It can reduce the effects of differential flexure because both cameras share most of the optical path.
The appropriate choice depends on focal length, optical design, available back focus, mechanical stiffness, and the brightness of accessible guide stars.
PHD2 and closed-loop guiding
PHD2 Guiding is open-source software that supports compatible guiding cameras and mounts. Its calibration process establishes how the guide camera’s measured star movement relates to the mount’s correction directions.
During operation, PHD2 monitors the reference stars and issues guide corrections when necessary. The resulting guiding graph can help identify oscillation, drift, poor calibration, or other problems.
A low guiding error measurement is useful, but image sharpness remains the ultimate test. Guide-camera image scale, main-camera image scale, seeing conditions, and optical performance must be considered together. [9] turn768467search6
Dithering and fixed-pattern noise
Dithering intentionally shifts the telescope’s pointing position by a small amount between some exposures. When the images are aligned on the stars during processing, fixed sensor artifacts appear at slightly different positions and can be rejected more effectively.
The imaging application generally controls the sequence, requests a dither, and waits for the guiding system to settle before the next exposure. PHD2’s documentation describes the interaction between acquisition software and guiding corrections. [10] turn768467search5
Dithering is valuable for certain long-exposure workflows, but it is not required for every beginner using a camera and a wide-angle lens.
Camera Settings for Astrophotography
Camera settings determine how much light is collected during an exposure and how that signal is recorded. The optimal settings depend on the target, camera, optics, sky brightness, and whether the mount is tracking.
There is no universal combination of aperture, ISO, and shutter speed. The best approach is to establish a practical starting point, capture a test frame, and adjust based on measurable results.
Manual exposure and shutter speed
Manual exposure mode is useful because it allows consistent control over aperture, shutter speed, and ISO. This consistency matters when capturing several frames intended for stacking or a timed sequence.
For untracked nightscapes, shutter speed must be short enough to limit unwanted star motion. For tracked deep-sky imaging, longer individual exposures become possible, but they must still account for mount accuracy, sky brightness, and highlight saturation.
Longer individual exposures do not automatically produce better results. The desired total integration time and the noise characteristics of the camera must also be considered.
Recommended starting settings
The following settings are experimental starting ranges, not guaranteed optimal exposure recipes.
| Imaging subject | Aperture | Starting ISO | Exposure approach |
|---|---|---|---|
| Untracked Milky Way | Around f/1.8 to f/4, depending on lens | 1600–6400 | Test short exposures using NPF estimation |
| Tracked Milky Way | Suitable wide lens aperture | 800–3200 | Test longer sky exposures without saturation |
| Star trails | Based on desired sharpness and ambient light | Often 400–3200 | Repeated fixed-tripod exposures |
| Moon | Appropriate lens aperture, often moderately stopped down | Often 100–400 | Short exposures checked against lunar highlights |
| Tracked nebulae | Lens or telescope’s useful working aperture | Camera-dependent | Repeated sub-exposures selected by sky and tracking performance |
| Planets | Depends on telescope and camera | Camera gain-dependent | Short video frames selected and stacked |
For a first Milky Way session, a 14 to 24 mm lens, a usable aperture near f/2.8, ISO around 3200, and exposure times established through test photographs can be a reasonable learning configuration. Nikon publishes real-world examples, but their settings vary substantially with equipment and conditions. [1][16] turn860431search0turn860431search1
How to achieve precise focus
Autofocus frequently struggles with faint stars, so manual focus is often more reliable. Aim toward a bright star or planet, activate magnified live view where available, and adjust the focus ring until the star appears as small and sharp as possible.
Do not assume that the infinity marking on the focus ring represents the correct position. Lens designs, manufacturing tolerances, adapters, and temperature changes can shift the best focus.
After focusing, take a short test exposure and inspect the image at full resolution. Check several parts of the frame before beginning a long sequence. For specialized telescope systems, a Bahtinov mask or electronic focusing tool can improve repeatability.
RAW capture, white balance, and histogram
RAW files preserve sensor data with greater flexibility than the camera’s processed JPEG output. They are preferred for workflows requiring calibration, stacking, and substantial tonal or color adjustments.
White balance determines how recorded colors are displayed and interpreted. With RAW data, photographers can adjust white balance during processing, although it is still useful to choose a consistent camera preview.
The histogram is valuable for detecting clipped highlights or an excessively bright background. However, a dark-looking histogram is not automatically evidence of a failed exposure. Night-sky images often require substantial processing before faint structures become visible.
Total integration time and signal-to-noise ratio
A single exposure is only one part of a deep-sky imaging session. The total integration time is the sum of the accepted light-frame exposure durations.
For example, 60 exposures of 60 seconds each provide one hour of integration. Under suitable conditions, stacking independent frames reduces the relative contribution of random noise and improves the visibility of faint structures.
In an idealized case dominated by independent random noise, signal-to-noise ratio improves approximately with the square root of the number of comparable exposures. Doubling the signal-to-noise ratio therefore generally requires around four times as much integration, assuming comparable conditions.
This improvement does not eliminate systematic artifacts, poor focus, tracking blur, or strong sky gradients. Calibration and careful processing remain important.
Astrophotography Setups for Different Celestial Objects
There is no single camera-and-lens combination that is ideal for every astronomical subject. The Milky Way, Moon, planets, nebulae, and galaxies differ in angular size, brightness, and the amount of fine detail available to photograph.
Understanding these differences makes equipment selection more straightforward. Rather than beginning with a particular camera model, identify the target and determine the field of view, exposure strategy, and tracking capability it requires.
Milky Way photography with a camera and tripod
Milky Way photography is an accessible starting point because the galaxy spans a large region of the sky. A DSLR or mirrorless camera fitted with a wide-angle lens can capture the galactic band while including landscape features in the foreground.
Begin at a dark location with a clear view of the desired sky region. Compose the scene, establish accurate focus, and choose an untracked shutter speed short enough to preserve reasonably sharp stars.
A tracker is optional for this style. It becomes beneficial when additional sky exposure time is needed, but tracked sky images may need to be combined with separate stationary foreground exposures.
Photographing the Moon with a telephoto lens
The Moon is a useful target for learning focus, exposure, and telephoto-lens handling. Its relatively high surface brightness often allows short exposures, especially compared with faint nebulae and galaxies.
A telephoto lens can produce recognizable lunar detail, although the visible size of the Moon depends on focal length and sensor dimensions. Increasing focal length makes focusing, atmospheric seeing, and support stability more important.
image_group{“query”:
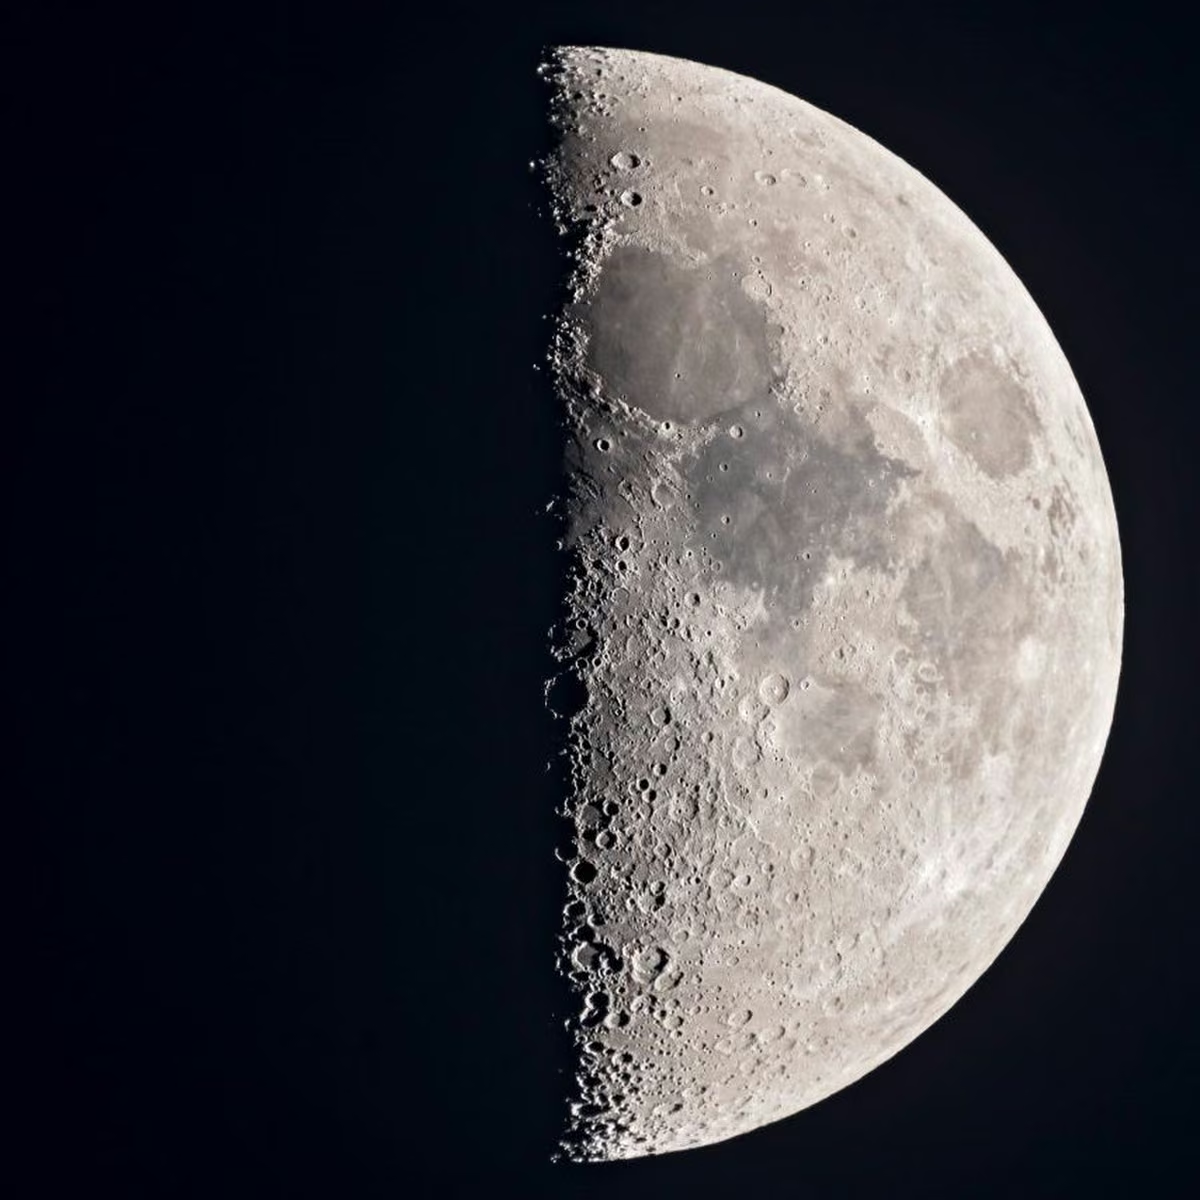
Lunar phases affect both composition and surface contrast. Near the terminator, the boundary between lunar day and night, shadows emphasize crater walls, mountains, and other relief features.
For a detailed lunar image, photographers may capture multiple short exposures or video frames and stack the sharpest results. This can reduce the visual impact of some atmospheric turbulence and image noise.
Photographing galaxies with a telephoto lens
Galaxies vary substantially in angular size. The Andromeda Galaxy, M31, is particularly interesting because its extended disk is much larger in apparent angular size than many beginners expect, although its outer regions are faint.
A telephoto lens can capture M31 as a clearly identifiable galaxy when the sensor, sky conditions, framing, total integration time, and tracking are suitable. Other smaller galaxies may require a longer focal length and more demanding equipment.
image_group{“query”:
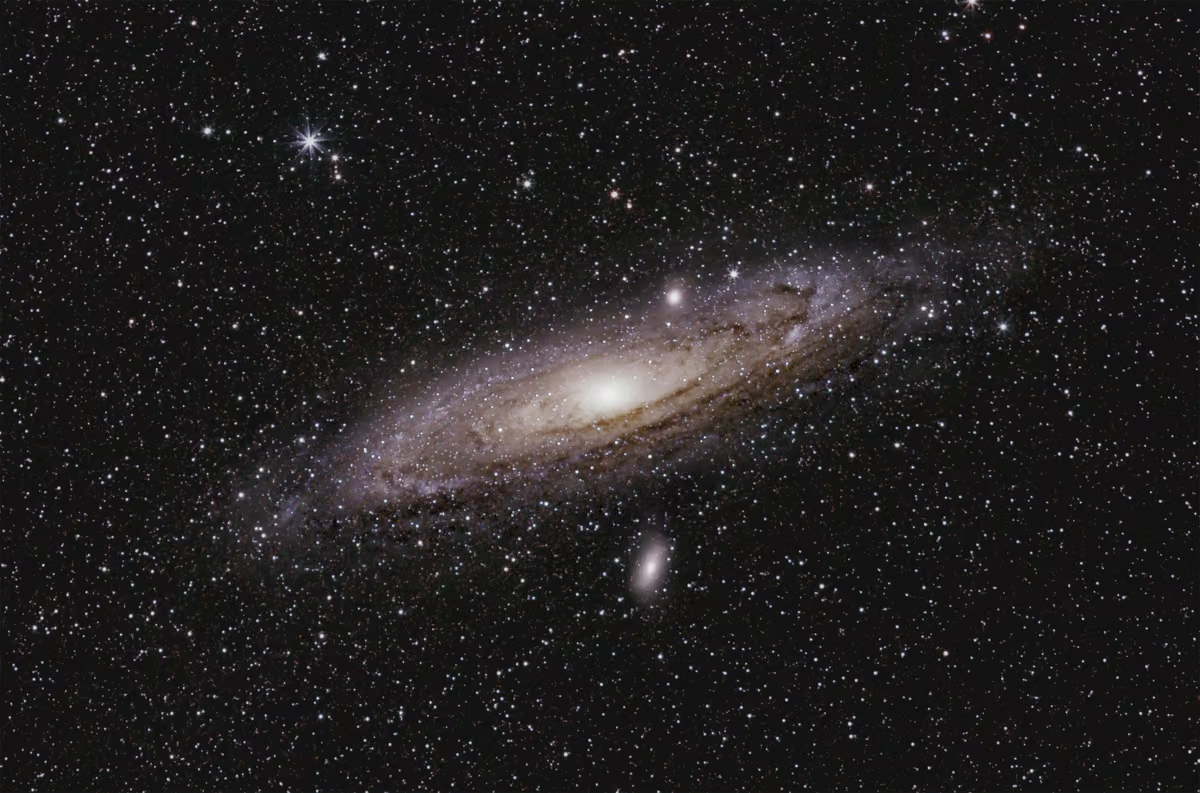
The most important consideration is not magnification alone. A narrow field of view may exclude the outer disk of a large galaxy, while excessive image scale can make the setup unnecessarily difficult to track.
For beginners moving into galaxy photography, an accurate portable equatorial system with a suitable telephoto lens can be an effective intermediate stage before adopting a telescope.
Nebulae and star clusters
Nebulae are clouds of gas and dust that appear in many different sizes and brightness ranges. Bright targets such as the Orion Nebula can be rewarding early deep-sky subjects, while faint emission nebulae may require substantially more integration time or specialized filters.
Open star clusters can also be photographed using conventional lenses, depending on their size. Their stellar composition makes focus, optical sharpness, and accurate star color particularly important.
image_group{“query”:
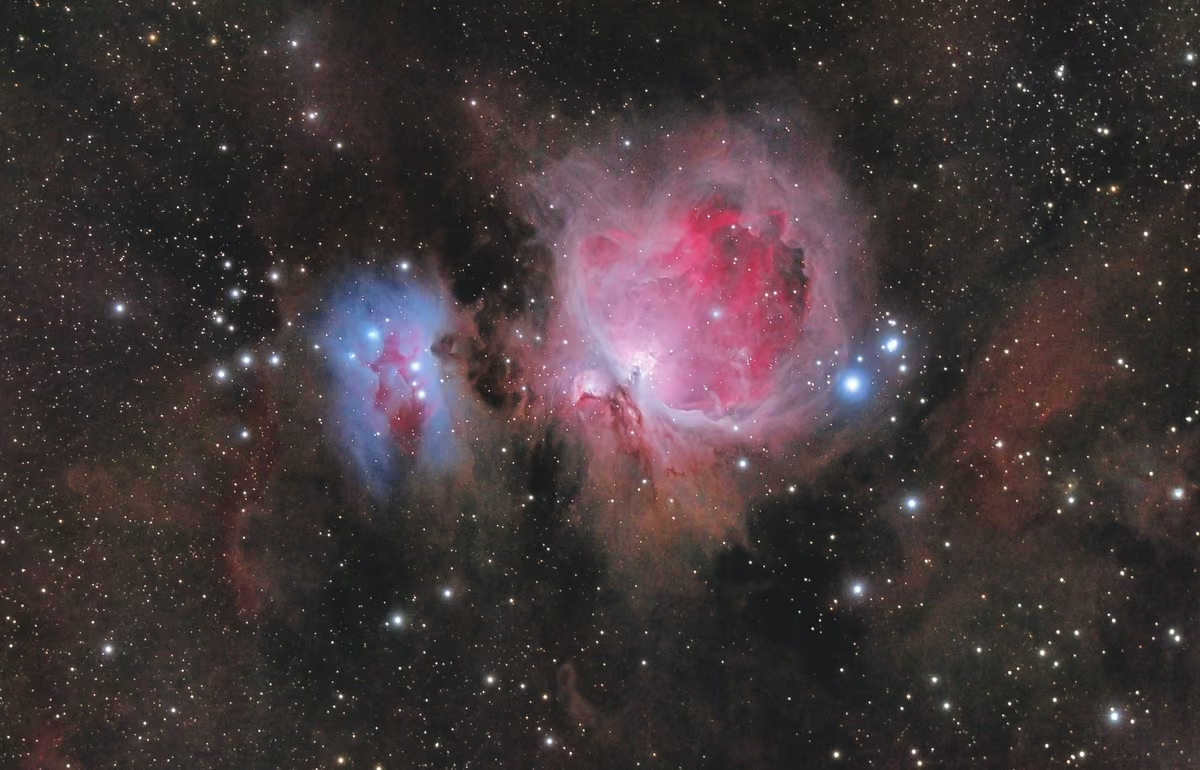
A wide-field image may capture the entire Orion region, including its surrounding stars and large-scale nebulosity. A narrower optical system can reveal more detail around the bright central nebula, provided the seeing and tracking support the selected image scale.
Careful exposure planning is important because bright nebular cores can saturate while surrounding material remains faint. Combining exposures of different durations can help preserve both regions.
Planetary photography
Planetary imaging places different demands on equipment. Jupiter, Saturn, and Mars have relatively small apparent diameters compared with expansive night-sky targets. A telescope and high-frame-rate camera are often better suited to recording their visible surface or atmospheric details.
Planetary photographers typically capture thousands of short video frames and use software to select, align, and stack the sharpest ones. This approach is intended to reduce the impact of changing atmospheric seeing.
A tracking mount is useful for keeping a planet in the camera’s limited field of view, but exceptionally long individual exposures are generally not part of the conventional high-resolution planetary workflow.
Astrophotography Filters and Specialized Accessories
Filters alter the wavelengths of light reaching the sensor. Some are intended to improve spectral selectivity, while others block unwanted wavelengths or support particular imaging techniques.
They are useful in the appropriate circumstances, but beginners do not need to purchase an extensive filter collection before photographing the Milky Way, constellations, or the Moon.
Broadband and light-pollution filters
Broadband filters transmit relatively large portions of the optical spectrum. Some light-pollution filters selectively block wavelength regions associated with artificial illumination.
Their effectiveness depends on the spectrum of the light pollution, the intended target, and the filter’s transmission characteristics. Modern broad-spectrum lighting can make simple light-pollution rejection less effective than it was under older lighting systems.
For broadband objects such as galaxies and reflection nebulae, filter selection requires particular care because blocking artificial light can also reject useful astronomical signal.
Narrowband filters for emission nebulae
Narrowband filters isolate relatively small wavelength regions associated with the emission of particular atoms and ions. Common astronomical emission lines include hydrogen-alpha at approximately 656.3 nm, oxygen-III at approximately 495.9 and 500.7 nm, and sulfur-II near 672.4 nm.
These filters are especially useful for selected emission nebulae because they can suppress much of the unwanted continuum sky background while preserving the relevant emission signal.
Monochrome cameras commonly capture separate narrowband channels. Compatible one-shot color cameras can use dual-narrowband or multiband filters to record multiple emission regions in one exposure. Filter performance also depends on optical focal ratio and the characteristics of the sensor. [11] turn790789search1turn768467search3
Dew heaters, intervalometers, and power
A dew heater provides controlled warmth near an optical surface to reduce condensation. It is especially helpful in humid conditions where a lens or telescope objective can cool below the local dew point.
An intervalometer automates exposure sequences and can reduce unnecessary camera handling. External power sources, spare batteries, and appropriate cables are useful for longer imaging sessions.
Accessories should be selected according to a specific requirement. An elaborate controller provides little benefit if the primary limitation is poor focus or an unstable tripod.
Important solar imaging safety
Never aim an unfiltered camera lens, telescope, or binoculars at the Sun or look through unfiltered optical equipment pointed toward it. Concentrated sunlight can cause severe eye injury and damage equipment.
Solar imaging requires correctly specified solar filters designed for the optical system and securely installed according to professional guidance. Ordinary night-sky filters, photographic neutral-density filters, and eclipse glasses placed behind magnifying optics are not suitable substitutes.
NASA advises that optical instruments require specialized filters attached to the front of the optics for safe solar observation. [15] turn165881search0
Planning an Astrophotography Session
Excellent equipment cannot eliminate poor weather or an unsuitable sky. Planning matters because celestial targets move across the local sky, moonlight changes the background illumination, and atmospheric conditions directly influence sharpness and contrast.
Light pollution and dark-sky locations
Artificial light scattered through the atmosphere increases the brightness of the night sky. This reduces contrast between faint celestial objects and the background, particularly for broadband imaging.
The Bortle scale is commonly used to describe general night-sky darkness, although it is an observational classification rather than a precise instrument measurement.
Traveling to a darker location can improve the appearance of the Milky Way and faint deep-sky targets more dramatically than many equipment changes. The Planetary Society emphasizes advance planning, suitable locations, and composition for night-sky photography. [14] turn752969search7
Moon phase, target altitude, and season
Bright moonlight increases background sky illumination, making faint Milky Way structures and broadband deep-sky objects harder to record. Moonless nights are generally preferable for faint broadband targets, although lunar photography obviously requires different timing.
Target altitude is also important. Objects near the horizon are observed through a greater amount of atmosphere, which can reduce clarity and increase atmospheric extinction.
Planetarium applications and observing planners help determine when a target will be visible, how high it will rise, and where it will appear relative to the foreground.
Atmospheric seeing and transparency
Seeing describes the blurring and distortion of astronomical images caused by atmospheric turbulence. It is especially important for lunar, planetary, and high-resolution deep-sky imaging.
Transparency describes how effectively the atmosphere transmits light. Thin clouds, haze, aerosols, and moisture can reduce transparency even when stars remain visible.
Good seeing and good transparency do not always occur together. Understanding their differences helps photographers decide whether a night is better suited to high-resolution targets or broad-field photography.
Step-by-Step Astrophotography Equipment Setup
A consistent preparation and capture routine prevents many avoidable problems. The exact sequence depends on whether the equipment includes a star tracker, telescope, or dedicated camera, but the principles remain similar.
Prepare and inspect the equipment
Before leaving home, verify that the camera, lens, memory card, battery, tripod, mounting plates, and accessories are compatible and operational. Charge the batteries and check available storage.
If using a tracker, test the power supply, mounting hardware, and control system in advance. Confirm that the total equipment load is appropriate for the mount.
Check the weather forecast, Moon phase, target location, and observing conditions. A properly prepared session reduces the amount of equipment adjustment required in darkness.
Assemble the camera and tracking system
Install the tripod on stable ground and secure the camera or mount. Avoid extending lightweight tripod components unnecessarily, especially in windy conditions.
When using an equatorial system, balance the equipment according to the mount’s instructions. Arrange power and control cables so they cannot pull on the camera or obstruct mount motion.
Verify that the optical system has sufficient clearance as it moves. Heavier setups should be checked throughout the expected tracking range rather than only at the initial position.
Align, focus, and frame the target
Polar align an equatorial tracker before beginning long exposures. Use the appropriate polar scope or assisted alignment method and check that the tripod has not shifted.
Point the camera toward the target using visible stars, planetarium references, or plate solving where supported.
Focus carefully using magnified live view or an appropriate focusing tool. Recheck focus after substantial temperature changes or if the optical system is disturbed.
Capture test exposures
Begin with a short test exposure to check composition, focus, exposure, and tracking performance. Inspect the image at full resolution rather than judging only from the camera’s small preview screen.
Look for elongated stars, clipped highlights, excessive sky brightness, corner aberrations, and vibration. Make corrections before starting a long automated sequence.
A few minutes spent checking the first exposures can prevent an entire night’s imaging data from being compromised.
Record light frames and calibration frames
Light frames contain the astronomical target. For stacking, capture multiple exposures under consistent settings and record the relevant camera configuration.
Dark frames measure repeatable thermal and electronic patterns with the sensor shielded from incoming light. Flat frames characterize field illumination differences and dust shadows. Bias or dark-flat frames support calibration, depending on the camera and processing software.
The usefulness and acquisition requirements of each frame type vary. Flat frames generally need to preserve the optical configuration being calibrated. Dark frames should be matched to relevant exposure and temperature conditions where required. [3]
Stack and process the images
Image stacking aligns the recorded stars and combines multiple frames into one dataset. Depending on the workflow, calibration may be applied before registration and integration.
After stacking, photographers often correct background gradients, adjust color balance, stretch faint signals, and apply controlled sharpening or noise reduction.
Processing cannot reconstruct details that were never successfully recorded. Sharp focus, suitable exposure, and accurate tracking remain the foundations of high-quality results.
Common Astrophotography Equipment Problems and Solutions
Equipment problems often appear as recognizable image defects. Understanding these patterns helps identify whether the camera, optics, mount, environment, or processing workflow is responsible.
| Problem | Possible causes | Practical response |
|---|---|---|
| Elongated stars across the frame | Excessive untracked exposure, tracking error, vibration | Shorten exposure; check mount and stability |
| Stars stretched near corners | Coma, astigmatism, or other optical aberrations | Test smaller apertures and inspect lens performance |
| Soft stars everywhere | Incorrect focus, poor seeing, vibration | Refocus and test shorter exposures |
| Bright or dark image corners | Vignetting, optical obstruction, calibration issues | Check adapters, lens coverage, and flats |
| Colored halos around stars | Chromatic aberration, filters, reflections | Compare filters and focus; inspect optics |
| Excessive background noise | Short integration, sensor noise, bright sky | Increase useful integration; improve sky conditions |
| Tracker loses alignment | Tripod movement, poor polar alignment, mechanical problems | Recheck mounting, balance, and polar alignment |
| Dew on optics | Optical surface cooling below dew point | Use appropriate dew prevention |
| Bright foreground with faint stars | Sky and foreground require different exposures | Consider separate exposures and careful blending |
Why longer exposures do not always improve an image
A longer exposure collects more signal, but it can also collect additional sky background, saturate bright stars, and reveal tracking imperfections. More exposure time is useful only when the recorded data remains suitable for the intended processing workflow.
Instead of increasing the shutter duration indefinitely, consider collecting more sub-exposures and evaluating total integration time.
Why expensive equipment can still produce blurry photographs
A high-end camera or telescope cannot compensate for an unstable mount, inaccurate focus, poor atmospheric seeing, or severe optical aberrations.
When troubleshooting, identify where the defect appears. Uniform blur often suggests focus, seeing, or movement. Distortion concentrated near the image edges may indicate an optical issue.
Changing one variable at a time makes it easier to identify the cause.
How to Build an Astrophotography Setup for Your Budget
The most cost-effective approach is to build equipment around an intended target and upgrade only when a clear limitation appears.
| Setup level | Suggested equipment | Suitable goals |
|---|---|---|
| Beginner | Existing DSLR or mirrorless, kit or wide-angle lens, sturdy tripod | Milky Way, constellations, star trails |
| Beginner with tracking | Camera, suitable lens, portable star tracker, tripod | Tracked Milky Way and wide-field deep-sky |
| Intermediate | Camera, telephoto lens or small refractor, equatorial mount | Large nebulae, clusters, selected galaxies |
| Advanced | Precision mount, dedicated camera, guiding, filters, controlled power | Long-integration deep-sky and specialized imaging |
Beginner: make the most of existing equipment
Start with the camera and lens already available. Learn manual exposure, accurate focusing, RAW processing, and image stacking before purchasing additional hardware.
If the tripod is unstable, improving it may provide a more obvious benefit than upgrading the camera. If the lens introduces severe aberrations, better optics may be the next priority.
Keep the initial setup simple enough to operate confidently in the dark.
Intermediate: invest in tracking and optics
A portable tracker extends the range of useful exposure techniques, particularly with wider lenses and moderate telephoto focal lengths.
As targets become smaller, a more precise equatorial mount and suitable optical system can become important. A small refractor is one option, but its focal length, optical quality, weight, and attachment requirements must match the mount.
At this stage, the priority should be a balanced imaging system rather than maximizing any one specification.
Advanced: specialize according to your target
Advanced imaging systems may include cooled cameras, monochrome sensors, filter wheels, off-axis guiding, computer-controlled focusing, and automated acquisition software.
These accessories improve control and repeatability, but they also increase setup complexity, power demand, and the number of components that can fail.
Advanced equipment is most valuable when its capabilities solve an existing limitation and support the photographer’s particular interests.
Common Equipment Buying Mistakes to Avoid
One common mistake is buying a long focal-length telescope before obtaining a mount capable of supporting it. As image scale increases, mechanical movement and tracking error become more visible, so mounting precision may be more important than a small improvement in camera performance.
Another mistake is assuming that a lower f-number automatically means better astronomical images. Wide-open aberrations, vignetting, and focusing behavior can reduce the useful advantage of a fast lens.
Beginners should also avoid confusing nominal payload ratings with guaranteed astrophotography performance. Likewise, GoTo functionality does not eliminate the need for appropriate tracking geometry or alignment.
The most effective equipment upgrade is usually the one that removes the largest verified limitation in the current system.
Frequently Asked Questions About Astrophotography Equipment
Can I do astrophotography with a normal camera?
Yes. A conventional DSLR or mirrorless camera can photograph the Milky Way, constellations, star trails, and several brighter astronomical targets. The most important starting requirements are controllable exposure settings, a suitable lens, and stable support. RAW image capture and manual focusing tools are especially useful.
Is a mirrorless camera better than a DSLR?
Not necessarily. Camera performance depends on the individual sensor, optical system, controls, power management, and acquisition requirements. Mirrorless cameras may offer convenient focusing features, while existing DSLR equipment can still produce excellent astronomical images. Replacing a functioning DSLR is not a prerequisite for learning astrophotography.
What is the best focal length for Milky Way photography?
Wide-angle focal lengths are generally useful for expansive Milky Way compositions. Around 14 to 35 mm on full-frame cameras is a practical range, depending on the intended field of view and foreground. Narrower focal lengths can also capture selected Milky Way regions, but their untracked exposure limits are shorter.
Do I need a star tracker for astrophotography?
No. A tracker is optional for many beginner subjects, particularly wide nightscapes and intentional star trails. It becomes more valuable when you want longer sky exposures or use focal lengths that make untracked imaging difficult.
How does a star tracker differ from a telescope mount?
A portable tracker is commonly optimized for lightweight cameras and lenses. Larger equatorial telescope mounts generally support heavier systems, additional positioning functions, and more advanced guiding options. Both can use the same basic principle of equatorial tracking.
What is the best ISO for astrophotography?
There is no universal best ISO. The appropriate value depends on sensor behavior, exposure duration, target brightness, and sky conditions. Choose an initial setting, inspect the RAW exposure, and consider whether changing ISO improves the recording without causing unnecessary highlight saturation.
Why are my stars blurry near the corners?
Corner distortion can result from coma, astigmatism, field curvature, or other optical aberrations. It may improve when the lens is stopped down, although this sacrifices some light. Testing at multiple apertures helps establish the lens’s most useful operating range.
Is autoguiding necessary for beginners?
Usually not for short-focal-length, short-exposure beginner setups. It becomes more valuable when a tracking mount’s mechanical errors are large enough to affect the desired exposure length or image scale. Accurate polar alignment and mechanical stability should still be established first.
Which should I upgrade first: camera, lens, or tracker?
Examine the images for evidence. If the stars trail during long exposures, tracking may be the priority. If stars are distorted near the frame edges, investigate the lens. If the optical and tracking systems are performing well but sensor limitations remain significant, a camera upgrade may be justified.
Conclusion: Choosing the Right Astrophotography Equipment
Astrophotography equipment works best when its components are chosen as a coordinated system. The camera records incoming light, the lens or telescope determines how that light is focused and framed, and the tripod or tracking mount provides the mechanical stability needed for sharp exposures.
For beginners, a DSLR or mirrorless camera, a suitable wide-angle lens, and a sturdy tripod are enough to develop valuable skills. As interests expand toward telephoto deep-sky imaging, tracking accuracy and optical quality become increasingly important.
The objective is not to own the most complex imaging system. It is to understand the limitations of the equipment you have, improve your techniques, and make each upgrade serve a specific photographic goal.
With careful planning, accurate focus, appropriate exposure settings, and a gradual approach to tracking, astrophotography offers a practical path from recording familiar stars to photographing distant structures of the universe.
Sources
The following technical references, observational guides, and manufacturer specifications support the explanations and recommendations throughout this article:
- Nikon, How to Photograph the Milky Way. Camera settings, manual focusing, tripods, and RAW workflows.
- Molly Wakeling, Astronomy Magazine, How to Get Started With DSLR Astrophotography. February 2025. Camera-and-tripod imaging and entry-level equipment.
- Sky & Telescope, Photometry: Measuring the Stars. Sensor behavior and astronomical calibration frames.
- Sky-Watcher, Star Adventurer. Portable equatorial tracking principles and supported tracking modes.
- Molly Wakeling, Astronomy Magazine, Which Astrophotography Camera Should You Choose?. February 2026. One-shot color and monochrome camera comparison.
- Sky & Telescope, Choosing the Best Lenses for Nightscapes. Lens performance, coma, astigmatism, and vignetting.
- PhotoPills, 500 Rule Photography Calculator and NPF Rule. Estimating exposure duration before noticeable star trailing.
- Celestron, What Is Field Rotation?. Mount geometry and field rotation.
- PHD2 Guiding, Official User Manual. Autoguiding, calibration, and tracking corrections.
- PHD2 Guiding, Supplemental Information: Dithering. Dithering and acquisition software coordination.
- Molly Wakeling, Astronomy Magazine, The Basics of Astroimaging Filters. Broadband, narrowband, and emission-line imaging.
- Nikon, Photographing the Night Sky: Star Trails. Stationary tripod techniques and multiple-exposure star-trail photography.
- Sky-Watcher, Star Adventurer GTi Specifications. Manufacturer mount specifications.
- The Planetary Society, Night Sky Photography for Beginners. Preparation, composition, and basic astrophotography techniques.
- NASA, Eclipse Viewing Safety. Safe solar observation and the proper use of solar filters.
- Nikon, Photographing the Night Sky. Exposure, focus, white balance, and practical night-sky techniques.
- Nikon, Chromatic Aberration. Axial and lateral chromatic aberration.